
Processors.md 12 KB
Processors
An Input Processor takes a value and returns a processed result for it. The received value and result value must be of the same type. For example, you can use a clamp Processor to clamp values from a control to a certain range.
Note: To convert received input values into different types, see composite Bindings.
Using Processors
You can install Processors on bindings, actions or on controls.
Processors on Bindings
When you create Bindings for your actions, you can choose to add Processors to the Bindings. These process the values from the controls they bind to, before the system applies them to the Action value. For instance, you might want to invert the Vector2 values from the controls along the Y axis before passing these values to the Action that drives the input logic for your application. To do this, you can add an Invert Vector2 Processor to your Binding.
If you're using Input Action Assets, you can add any Processor to your Bindings in the Input Action editor. Select the Binding you want to add Processors to so that the right pane of the window displays the properties for that Binding. Select the Add (+) icon on the Processors foldout to open a list of all available Processors that match your control type, then choose a Processor type to add a Processor instance of that type. The Processor now appears under the Processors foldout. If the Processor has any parameters, you can edit them in the Processors foldout.
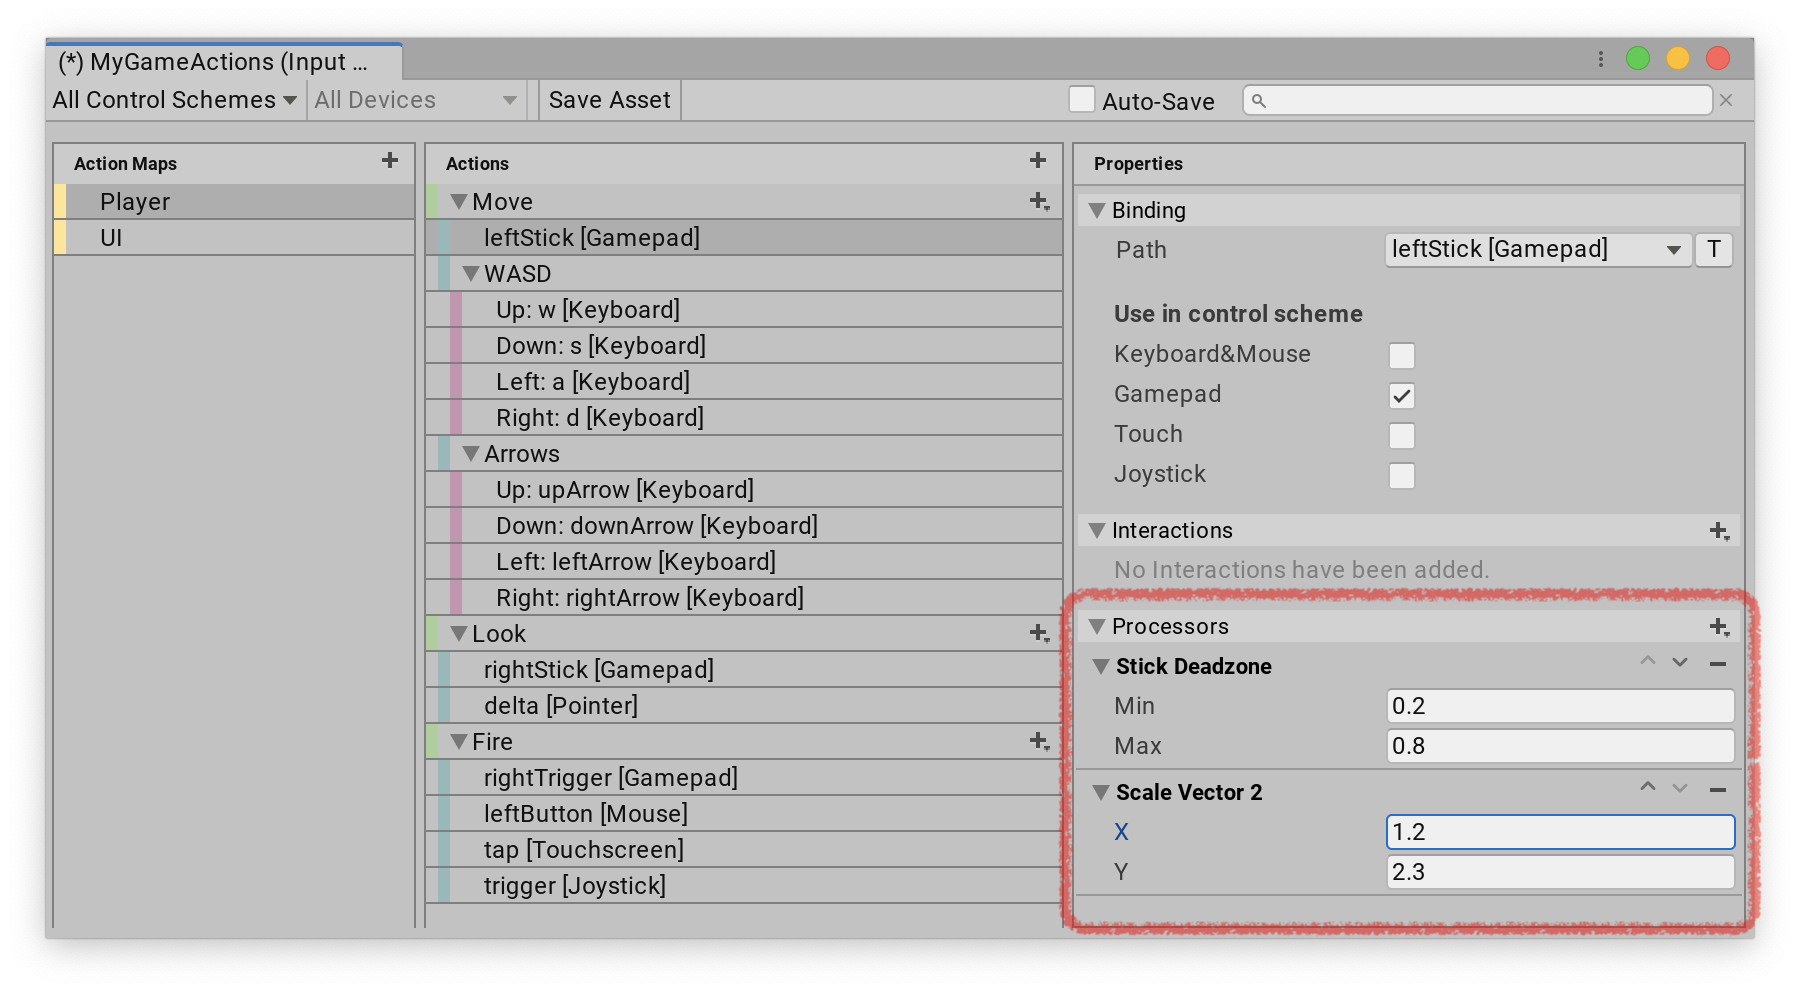
To remove a Processor, click the Remove (-) icon next to it. You can also use the up and down arrows to change the order of Processors. This affects the order in which the system processes values.
If you create your Bindings in code, you can add Processors like this:
var action = new InputAction();
action.AddBinding("<Gamepad>/leftStick")
    .WithProcessor("invertVector2(invertX=false)");
Processors on Actions
Processors on Actions work in the same way as Processors on Bindings, but they affect all controls bound to an Action, rather than just the controls from a specific Binding. If there are Processors on both the Binding and the Action, the system processes the ones from the Binding first.
You can add and edit Processors on Actions in Input Action Assets the same way as you would for Bindings: select an Action to edit, then add one or more Processors in the right window pane.
If you create your Actions in code, you can add Processors like this:
var action = new InputAction(processors: "invertVector2(invertX=false)");
Processors on Controls
You can have any number of Processors directly on an InputControl, which then process the values read from the Control. Whenever you call ReadValue on a Control, all Processors on that Control process the value before it gets returned to you. You can use ReadUnprocessedValue on a Control to bypass the Processors.
The Input System adds Processors to a Control during device creation, if they're specified in the Control's layout. You can't add Processors to existing Controls after they've been created, so you can only add Processors to Controls when you're creating custom devices. The devices that the Input System supports out of the box already have some useful Processors added on their Controls. For instance, sticks on gamepads have a Stick Deadzone Processor.
If you're using a layout generated by the Input System from a state struct using InputControlAttributes, you can specify the Processors you want to use via the processors property of the attribute, like this:
public struct MyDeviceState : IInputStateTypeInfo
{
    public FourCC format => return new FourCC('M', 'Y', 'D', 'V');

    // Add an axis deadzone to the Control to ignore values
    // smaller then 0.2, as our Control does not have a stable
    // resting position.
    [InputControl(layout = "Axis", processors = "AxisDeadzone(min=0.2)")]
    public short axis;
}
If you create a layout from JSON, you can specify Processors on your Controls like this:
{
    "name" : "MyDevice",
    "extend" : "Gamepad", // Or some other thing
    "controls" : [
        {
            "name" : "axis",
            "layout" : "Axis",
            "offset" : 4,
            "format" : "FLT",
            "processors" : "AxisDeadzone(min=0.2)"
        }
    ]
}
Predefined Processors
The Input System package comes with a set of useful Processors you can use.
Axis Deadzone
| Name | AxisDeadzone |
|---|---|
| Operand Type | float |
| Parameters | float minfloat max |
An axis deadzone Processor scales the values of a Control so that any value with an absolute value smaller than min is 0, and any value with an absolute value larger than max is 1 or -1. Many Controls don't have a precise resting point (that is, they don't always report exactly 0 when the Control is in the center). Using the min value on a deadzone Processor avoids unintentional input from such Controls. Also, some Controls don't consistently report their maximum values when moving the axis all the way. Using the max value on a deadzone Processor ensures that you always get the maximum value in such cases.
Clamp
| Name | Clamp |
|---|---|
| Operand Type | float |
| Parameters | float minfloat max |
Clamps input values to the [min..max] range.
Invert
| Name | Invert |
|---|---|
| Operand Type | float |
Inverts the values from a Control (that is, multiplies the values by -1).
Invert Vector 2
| Name | InvertVector2 |
|---|---|
| Operand Type | Vector2 |
| Parameters | bool invertXbool invertY |
Inverts the values from a Control (that is, multiplies the values by -1). Inverts the x axis of the vector if invertX is true, and the y axis if invertY is true.
Invert Vector 3
| Name | InvertVector3 |
|---|---|
| Operand Type | Vector3 |
| Parameters | bool invertXbool invertYbool invertZ |
Inverts the values from a Control (that is, multiplies the values by -1). Inverts the x axis of the vector if invertX is true, the y axis if invertY is true, and the z axis if invertZ is true.
Normalize
| Name | Normalize |
|---|---|
| Operand Type | float |
| Parameters | float minfloat maxfloat zero |
Normalizes input values in the range [min..max] to unsigned normalized form [0..1] if min is >= zero, and to signed normalized form [-1..1] if min < zero.
Normalize Vector 2
| Name | NormalizeVector2 |
|---|---|
| Operand Type | Vector2 |
Normalizes input vectors to be of unit length (1). This is the same as calling Vector2.normalized.
Normalize Vector 3
| Name | NormalizeVector3 |
|---|---|
| Operand Type | Vector3 |
Normalizes input vectors to be of unit length (1). This is the same as calling Vector3.normalized.
Scale
| Name | Scale |
|---|---|
| Operand Type | float |
| Parameters | float factor |
Multiplies all input values by factor.
Scale Vector 2
| Name | ScaleVector2 |
|---|---|
| Operand Type | Vector2 |
| Parameters | float xfloat y |
Multiplies all input values by x along the X axis and by y along the Y axis.
Scale Vector 3
| Name | ScaleVector3 |
|---|---|
| Operand Type | Vector3 |
| Parameters | float xfloat yfloat x |
Multiplies all input values by x along the X axis, by y along the Y axis, and by z along the Z axis.
Stick deadzone
| Name | StickDeadzone |
|---|---|
| Operand Type | Vector2 |
| Parameters | float minfloat max |
A stick deadzone Processor scales the values of a Vector2 Control, such as a stick, so that any input vector with a magnitude smaller than min results in (0,0), and any input vector with a magnitude greater than max is normalized to length 1. Many Controls don't have a precise resting point (that is, they don't always report exactly 0,0 when the Control is in the center). Using the min value on a deadzone Processor avoids unintentional input from such Controls. Also, some Controls don't consistently report their maximum values when moving the axis all the way. Using the max value on a deadzone Processor ensures that you always get the maximum value in such cases.
Writing custom Processors
You can also write custom Processors to use in your Project. Custom Processors are available in the UI and code in the same way as the built-in Processors. Add a class derived from InputProcessor<TValue>, and implement the Process method:
public class MyValueShiftProcessor : InputProcessor<float>
{
    [Tooltip("Number to add to incoming values.")]
    public float valueShift = 0;

    public override float Process(float value, InputControl control)
    {
        return value + valueShift;
    }
}
Now, you need to tell the Input System about your Processor. Call InputSystem.RegisterProcessor in your initialization code. You can do so locally within the Processor class like this:
#if UNITY_EDITOR
[InitializeOnLoad]
#endif
public class MyValueShiftProcessor : InputProcessor<float>
{
    #if UNITY_EDITOR
    static MyValueShiftProcessor()
    {
        Initialize();
    }
    #endif

    [RuntimeInitializeOnLoadMethod]
    static void Initialize()
    {
        InputSystem.RegisterProcessor<MyValueShiftProcessor>();
    }

    //...
}
Your new Processor is now available in the Input Action Asset Editor window, and you can also add it in code like this:
var action = new InputAction(processors: "myvalueshift(valueShift=2.3)");
If you want to customize the UI for editing your Processor, create a custom InputParameterEditor class for it:
// No registration is necessary for an InputParameterEditor.
// The system will automatically find subclasses based on the
// <..> type parameter.
#if UNITY_EDITOR
public class MyValueShiftProcessorEditor : InputParameterEditor<MyValueShiftProcessor>
{
    private GUIContent m_SliderLabel = new GUIContent("Shift By");

    public override void OnEnable()
    {
        // Put initialization code here. Use 'target' to refer
        // to the instance of MyValueShiftProcessor that is being
        // edited.
    }

    public override void OnGUI()
    {
        // Define your custom UI here using EditorGUILayout.
        target.valueShift = EditorGUILayout.Slider(m_SliderLabel,
            target.valueShift, 0, 10);
    }
}
#endif