
Interactions.md 24 KB
Interactions
An Interaction represents a specific input pattern. For example, a hold is an Interaction that requires a Control to be held for at least a minimum amount of time.
Interactions drive responses on Actions. You can place them on individual Bindings or an Action as a whole, in which case they apply to every Binding on the Action. At runtime, when a particular interaction completes, this triggers the Action.
Operation
An Interaction has a set of distinct phases it can go through in response to receiving input.
| Phase | Description |
|---|---|
Waiting |
The Interaction is waiting for input. |
Started |
The Interaction has been started (that is, it received some of its expected input), but is not complete yet. |
Performed |
The Interaction is complete. |
Canceled |
The Interaction was interrupted and aborted. For example, the user pressed and then released a button before the minimum time required for a hold Interaction to complete. |
Not every Interaction triggers every phase, and the pattern in which specific Interactions trigger phases depends on the Interaction type.
While Performed is typically the phase that triggers the actual response to an Interaction, Started and Canceled can be useful for providing UI feedback while the Interaction is in progress. For example, when a hold is Started, the app can display a progress bar that fills up until the hold time has been reached. If, however, the hold is Canceled before it completes, the app can reset the progress bar to the beginning.
The following example demonstrates this kind of setup with a fire Action that the user can tap to fire immediately, or hold to charge:
var fireAction = new InputAction("fire");
fireAction.AddBinding("<Gamepad>/buttonSouth")
    // Tap fires, slow tap charges. Both act on release.
    .WithInteractions("tap;slowTap");

fireAction.started +=
    context =>
    {
        if (context.Interaction is SlowTapInteraction)
            ShowChargingUI();
    };

fireAction.performed +=
    context =>
    {
        if (context.Interaction is SlowTapInteraction)
            ChargedFire();
        else
            Fire();
    };

fireAction.canceled +=
    _ => HideChargingUI();
Multiple Controls on an Action
If you have multiple Controls bound to a Binding or an Action which has an Interaction, then the Input System first applies the Control disambiguation logic to get a single value for the Action, which it then feeds to the Interaction logic. Any of the bound Controls can perform the Interaction.
Multiple Interactions on a Binding
If multiple Interactions are present on a single Binding or Action, then the Input System checks the Interactions in the order they are present on the Binding. The code example above illustrates this example. The Binding on the fireAction Action has two Interactions: WithInteractions("tap;slowTap"). The tap Interaction gets a first chance at interpreting the input from the Action. If the button is pressed, the Action calls the Started callback on the tap Interaction. If the user keeps holding the button, the tap Interaction times out, and the Action calls the Canceled callback for the tap Interaction and starts processing the slow tap Interaction (which now receives a Started callback).
Using Interactions
You can install Interactions on Bindings or Actions.
Interactions on Bindings
When you create Bindings for your Actions, you can choose to add Interactions to the Bindings.
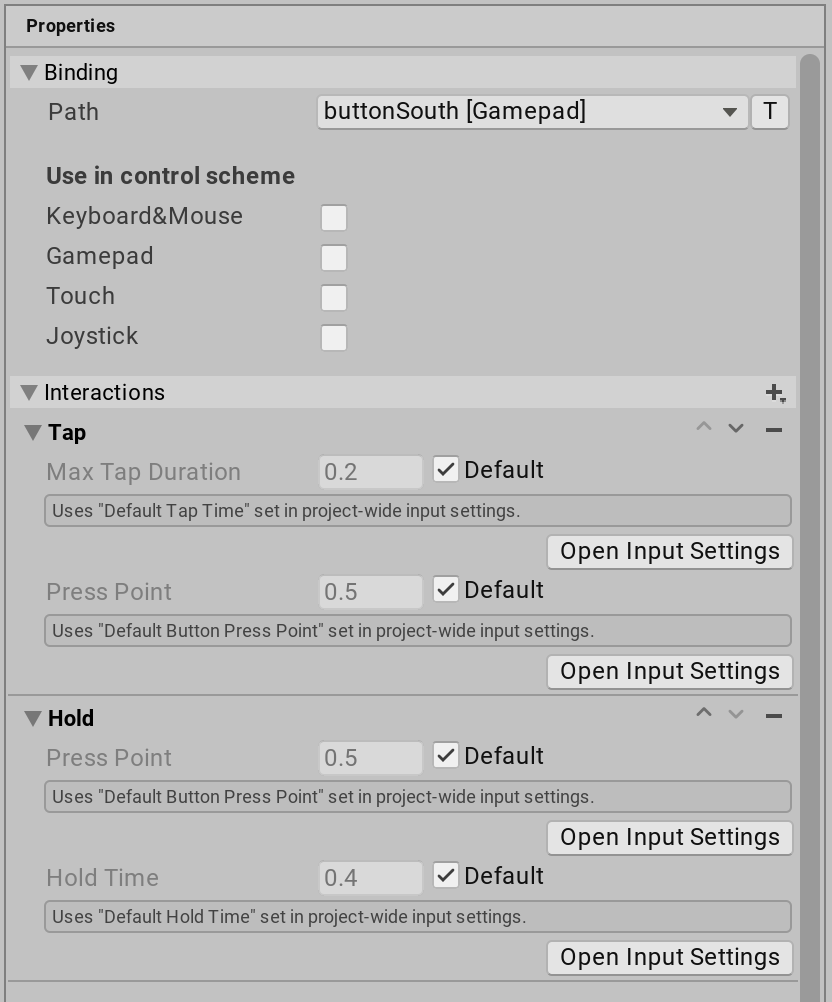
If you're using Input Action Assets, you can add any Interaction to your Bindings in the Input Action editor. Once you created some Bindings, select the Binding you want to add Interactions to, so that the right pane of the window shows the properties for that Binding. Next, click on the plus icon on the Interactions foldout to open a list of all available Interactions types. Choose an Interaction type to add an Interaction instance of that type. The Interaction now appears in the Interactions foldout. If the Interaction has any parameters, you can now edit them here as well:
To remove an Interaction, click the minus button next to it. To change the order of Interactions, click the up and down arrows.
If you create your Bindings in code, you can add Interactions like this:
var Action = new InputAction();
action.AddBinding("<Gamepad>/leftStick")
    .WithInteractions("tap(duration=0.8)");
Interactions on Actions
Interactions on Actions work very similar to Interactions on Bindings, but they affect all Controls bound to an Action, not just the ones coming from a specific Binding. If there are Interactions on both the Binding and the Action, the Input System processes the ones from the binding first.
You can add and edit Interactions on Actions in the Input Action Assets editor window the same way as you would do for Bindings: select an Action to Edit, then add the Interactions in the right window pane.
If you create your Actions in code, you can add Interactions like this:
var Action = new InputAction(Interactions: "tap(duration=0.8)");
Predefined Interactions
The Input System package comes with a set of basic Interactions you can use. If an Action has no Interactions set, the system uses its default Interaction.
Note: The built-in Interactions operate on Control actuation and don't use Control values directly. The Input System evaluates the
pressPointparameters against the magnitude of the Control actuation. This means you can use these Interactions on any Control which has a magnitude, such as sticks, and not just on buttons.
Default Interaction
If you haven't specifically added an Interaction to a Binding or its Action, the default Interaction applies to the Binding.
Value or Button type Actions have the following behavior:
- As soon as a bound Control becomes actuated, the Action goes from
WaitingtoStarted, and then immediately toPerformedand back toStarted. One callback occurs onInputAction.started, followed by one callback onInputAction.performed. - For as long as the bound Control remains actuated, the Action stays in
Startedand triggersPerformedwhenever the value of the Control changes (that is, one call occurs toInputAction.performed). - When the bound Control stops being actuated, the Action goes to
Canceledand then back toWaiting. One call occurs toInputAction.canceled.
PassThrough type Actions have a simpler behavior. The Input System doesn't try to track any Interaction states (which would be meaningless if tracking several Controls separately). Instead, it triggers a Performed callback for each value change.
Callbacks/InputAction.type |
Value or Button |
PassThrough |
|---|---|---|
started |
Control is actuated. | not used |
performed |
Controls changes actuation. This also triggers when started triggers. |
Control changes value |
canceled |
Control is no longer actuated. | not used |
Press
You can use a PressInteraction to explicitly force button-like interactions. Use the behavior parameter to select if the Interaction should trigger on button press, release, or both.
| Parameters | Type | Default value |
|---|---|---|
pressPoint |
float |
InputSettings.defaultButtonPressPoint |
behavior |
PressBehavior |
PressOnly |
Callbacks/behavior |
PressOnly |
ReleaseOnly |
PressAndRelease |
|---|---|---|---|
started |
Control magnitude crosses pressPoint |
Control magnitude crosses pressPoint |
Control magnitude crosses pressPoint |
performed |
Control magnitude crosses pressPoint |
Control magnitude goes back below pressPoint |
- Control magnitude crosses pressPointor - Control magnitude goes back below pressPoint |
canceled |
not used | not used | not used |
Hold
A HoldInteraction requires the user to hold a Control for duration seconds before the Input System triggers the Action.
| Parameters | Type | Default value |
|---|---|---|
duration |
float |
InputSettings.defaultHoldTime |
pressPoint |
float |
InputSettings.defaultButtonPressPoint |
| Callbacks | |
|---|---|
started |
Control magnitude crosses pressPoint. |
performed |
Control magnitude held above pressPoint for >= duration. |
canceled |
Control magnitude goes back below pressPoint before duration (that is, the button was not held long enough). |
Tap
A TapInteraction requires the user to press and release a Control within duration seconds to trigger the Action.
| Parameters | Type | Default value |
|---|---|---|
duration |
float |
InputSettings.defaultTapTime |
pressPoint |
float |
InputSettings.defaultButtonPressPoint |
| Callbacks | |
|---|---|
started |
Control magnitude crosses pressPoint. |
performed |
Control magnitude goes back below pressPoint before duration. |
canceled |
Control magnitude held above pressPoint for >= duration (that is, the tap was too slow). |
SlowTap
A SlowTapInteraction requires the user to press and hold a Control for a minimum duration of duration seconds, and then release it, to trigger the Action.
| Parameters | Type | Default value |
|---|---|---|
duration |
float |
InputSettings.defaultSlowTapTime |
pressPoint |
float |
InputSettings.defaultButtonPressPoint |
| Callbacks | |
|---|---|
started |
Control magnitude crosses pressPoint. |
performed |
Control magnitude goes back below pressPoint after duration. |
canceled |
Control magnitude goes back below pressPoint before duration (that is, the tap was too fast). |
MultiTap
A MultiTapInteraction requires the user to press and release a Control within tapTime seconds tapCount times, with no more then tapDelay seconds passing between taps, for the Interaction to trigger. You can use this to detect double-click or multi-click gestures.
| Parameters | Type | Default value |
|---|---|---|
tapTime |
float |
InputSettings.defaultTapTime |
tapDelay |
float |
2 * tapTime |
tapCount |
int |
2 |
pressPoint |
float |
InputSettings.defaultButtonPressPoint |
| Callbacks | |
|---|---|
started |
Control magnitude crosses pressPoint. |
performed |
Control magnitude went back below pressPoint and back up above it repeatedly for tapCount times. |
canceled |
- After going back below pressPoint, Control magnitude did not go back above pressPoint within tapDelay time (that is, taps were spaced out too far apart).or - After going back above pressPoint, Control magnitude did not go back below pressPoint within tapTime time (that is, taps were too long). |
Writing custom Interactions
You can also write a custom Interaction to use in your Project. You can use custom Interactions in the UI and code the same way you use built-in Interactions. Add a class implementing the IInputInteraction interface, like this:
// Interaction which performs when you quickly move an
// axis all the way from extreme to the other.
public class MyWiggleInteraction : IInputInteraction
{
    public float duration = 0.2;

    void Process(ref InputInteractionContext context)
    {
        if (context.timerHasExpired)
        {
            context.Canceled();
            return;
        }

        switch (context.phase)
        {
            case InputActionPhase.Waiting:
                if (context.Control.ReadValue<float>() == 1)
                {
                    context.Started();
                    context.SetTimeout(duration);
                }
                break;

            case InputActionPhase.Started:
                if (context.Control.ReadValue<float>() == -1)
                    context.Performed();
                break;
        }
    }

    // Unlike processors, Interactions can be stateful, meaning that you can keep a
    // local state that mutates over time as input is received. The system might
    // invoke the Reset() method to ask Interactions to reset to the local state
    // at certain points.
    void Reset()
    {
    }
}
Now, you need to tell the Input System about your Interaction. Call this method in your initialization code:
InputSystem.RegisterInteraction<MyWiggleInteraction>();
Your new Interaction is now available in the Input Action Asset Editor window. You can also add it in code like this:
var Action = new InputAction(Interactions: "MyWiggle(duration=0.5)");