
Testing.md 7.6 KB
Input testing
The Input System has built-in support for writing automated input tests. You can drive input entirely from code, without any dependencies on platform backends and physical hardware devices. The automated input tests you write consider the generated input to be the same as input generated at runtime by actual platform code.
Setting up test assemblies
To set up a test assembly that uses the Input System's automation framework, follow these steps:
In the
Packages/manifest.jsonfile of your project,com.unity.inputsystemmust be listed intestables. This is necessary for test code that comes with the package to be included with test builds of your project.
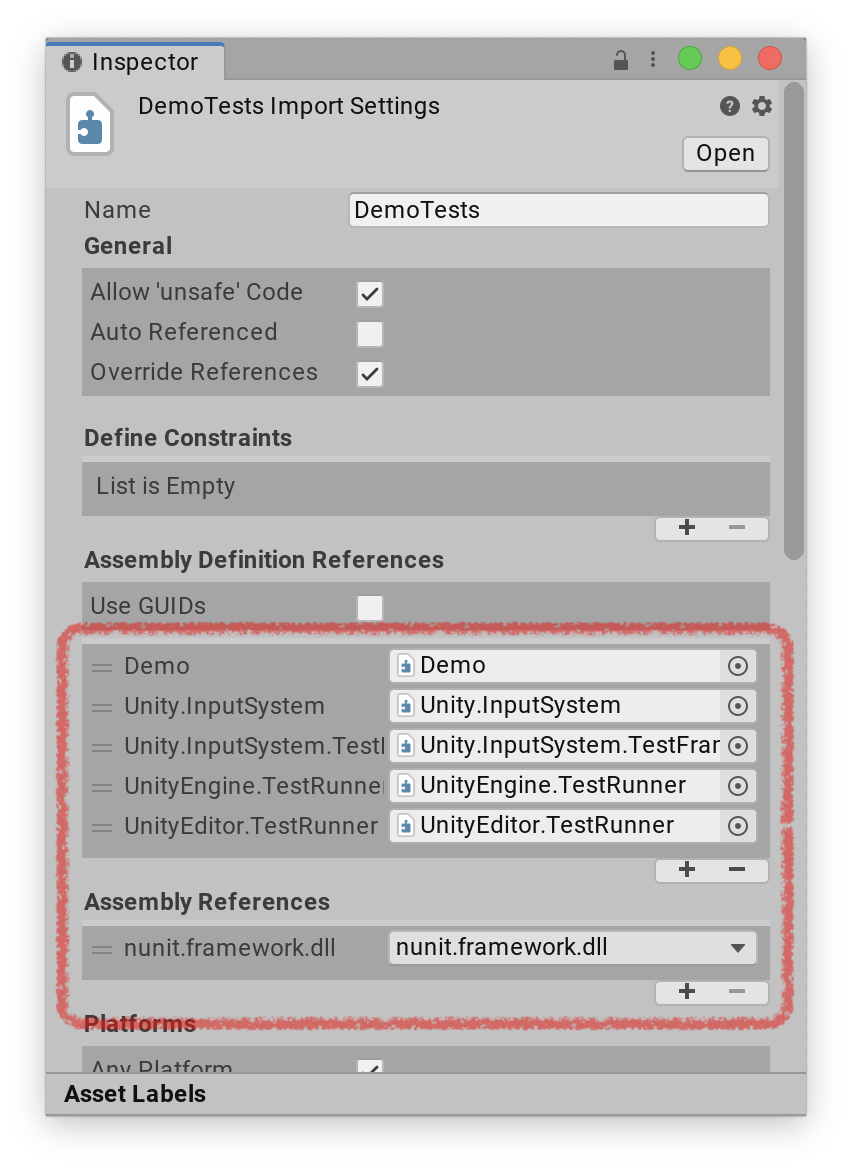
You can, for example, add this after thedependenciesproperty like so:}, "testables" : [ "com.unity.inputsystem" ]- Create a new assembly definition (menu: Create > Assembly Definition) or go to an assembly definition for a test assembly that you have already created.
- Add references to
nunit.framework.dll,UnityEngine.TestRunner, andUnityEditor.TestRunner(as described in How to create a new test assembly), as well asUnity.InputSystemandUnity.InputSystem.TestFrameworkfor the Input System.
Setting up test fixtures
Use
InputTestFixtureto create an isolated version of the Input System for tests. The fixture sets up a blank, default-initialized version of the Input System for each test, and restores the Input System to its original state after the test completes. The default-initialized version has all built-in registrations (such as layout and processors), but doesn't have any pre-existing Input Devices.You can use the fixture as a base class for your own fixture:
class MyTests : InputTestFixture
{
[Test]
public void CanPressButtonOnGamepad()
{
    var gamepad = InputSystem.AddDevice<Gamepad>();
    Press(gamepad.buttonSouth);
}
}
Alternatively, you can instantiate it in your fixture:
[TestFixture]
class MyTestFixture
{
    private InputTestFixture input = new InputTestFixture();
}
This is especially useful when creating a larger setup for game testing using PrebuiltSetup.
[PrebuildSetup("GameTestPrebuildSetup")]
public class GameTestFixture
{
    public Game game { get; set; }
    public InputTestFixture input { get; set; }

    public Mouse mouse { get; set; }
    public Keyboard keyboard { get; set; }
    public Touchscreen touchscreen { get; set; }
    public Gamepad gamepad { get; set; }

    //...
}

#if UNITY_EDITOR
public class GameTestPrebuildSetup : IPrebuildSetup
{
    public void Setup()
    {
        UnityEditor.EditorBuildSettings.scenes = new[]
        {
            new UnityEditor.EditorBuildSettingsScene("Assets/Scenes/Main.unity", true)
        };
    }
}
#endif
Writing tests
When writing a test, use InputSystem.AddDevice<T>() to add new Devices.
    [Test]
    public void PlayerInput_CanInstantiatePlayer_WithSpecificControlScheme()
    {
        InputSystem.AddDevice<Gamepad>();
        var keyboard = InputSystem.AddDevice<Keyboard>();
        var mouse = InputSystem.AddDevice<Mouse>();

        var prefab = new GameObject();
        prefab.SetActive(false);
        var prefabPlayerInput = prefab.AddComponent<PlayerInput>();
        prefabPlayerInput.actions = InputActionAsset.FromJson(kActions);

        var player = PlayerInput.Instantiate(prefab, controlScheme: "Keyboard&Mouse");

        Assert.That(player.devices, Is.EquivalentTo(new InputDevice[] { keyboard, mouse }));
        Assert.That(player.controlScheme, Is.EqualTo("Keyboard&Mouse"));
    }
To feed input, the easiest way is to use the Press(button), Release(button), PressAndRelease(button), Set(control,value), and Trigger(action) helper methods provided by InputTestFixture.
    [Test]
    public void Actions_WhenDisabled_CancelAllStartedInteractions()
    {
        var gamepad = InputSystem.AddDevice<Gamepad>();

        var action1 = new InputAction("action1", binding: "<Gamepad>/buttonSouth", interactions: "Hold");
        var action2 = new InputAction("action2", binding: "<Gamepad>/leftStick");

        action1.Enable();
        action2.Enable();

        Press(gamepad.buttonSouth);
        Set(gamepad.leftStick, new Vector2(0.123f, 0.234f));

        using (var trace = new InputActionTrace())
        {
            trace.SubscribeTo(action1);
            trace.SubscribeTo(action2);

            runtime.currentTime = 0.234f;
            runtime.advanceTimeEachDynamicUpdate = 0;

            action1.Disable();
            action2.Disable();

            var actions = trace.ToArray();

            Assert.That(actions.Length, Is.EqualTo(2));
            //...
        }
    }
Alternatively, you can use code to feed arbitrary input events into the system, and run arbitrary input updates:
    [Test]
    public void PlayerInput_JoiningPlayerThroughButtonPress_WillFailIfDeviceIsNotUsableWithPlayerActions()
    {
        var playerPrefab = new GameObject();
        playerPrefab.SetActive(false);
        playerPrefab.AddComponent<PlayerInput>();
        playerPrefab.GetComponent<PlayerInput>().actions = InputActionAsset.FromJson(kActions);

        var manager = new GameObject();
        var listener = manager.AddComponent<MessageListener>();
        var managerComponent = manager.AddComponent<PlayerInputManager>();
        managerComponent.joinBehavior = PlayerJoinBehavior.JoinPlayersWhenButtonIsPressed;
        managerComponent.playerPrefab = playerPrefab;

        // Create a Device based on the HID layout with a single button control.
        const string kLayout = @"
            {
                ""name"" : ""TestDevice"",
                ""extend"" : ""HID"",
                ""controls"" : [
                    { ""name"" : ""button"", ""layout"" : ""Button"" }
                ]
            }
        ";

        InputSystem.RegisterLayout(kLayout);
        var device = InputSystem.AddDevice("TestDevice");

        using (StateEvent.From(device, out var eventPtr))
        {
            ((ButtonControl)device["button"]).WriteValueIntoEvent(1f, eventPtr);
            InputSystem.QueueEvent(eventPtr);
            InputSystem.Update();
        }

        Assert.That(listener.messages, Is.Empty);
        Assert.That(PlayerInput.all, Is.Empty);
    }
Note: For reference, you can find the tests for the Input System itself in its GitHub repository.