Components.md 21 KB
GameObject components for input
The Input System provides two MonoBehaviour components that simplify how you set up and work with input:
| Component | Description |
|---|---|
PlayerInput |
Represents a single player, and that player's associated Input Actions. |
PlayerInputManager |
Handles setups that allow for several concurrent users (for example, player lobbies and split-screen gameplay in a game). |
Note: These components are built on top of the public Input System API. As such, they don't do anything that you can't program yourself. They are meant primarily as an easy, out-of-the-box setup that eliminates much of the need for custom scripting.
PlayerInput component
Each PlayerInput instance represents a separate player or user. Multiple PlayerInput instances can exist at the same time (though not on the same GameObject) to represent local multiplayer setups. The Input System pairs each player to a unique set of Devices that the player uses exclusively, but you can also manually pair Devices in a way that enables two or more players to share a Device (for example, left/right keyboard splits or hot seat use).
Each PlayerInput corresponds to one InputUser. You can use PlayerInput.user to query the InputUser from the component.
You can use the following properties to configure PlayerInput:
| Property | Description |
|---|---|
Actions |
The set of Input Actions associated with the player. To receive input, each player must have an associated set of Actions. See documentation on Actions for details. |
Default Control Scheme |
Which Control Scheme (from what is defined in Actions) to enable by default. |
Default Action Map |
Which Action Map in Actions to enable by default. If set to None, then the player starts with no Actions being enabled. |
Camera |
The individual camera associated with the player. This is only required when employing split-screen setups and has no effect otherwise. |
Behavior |
How the PlayerInput component notifies game code about things that happen with the player. See documentation on notification behaviors. |
Actions
To receive input, each player must have an associated set of Input Actions. When you create these via the PlayerInput Inspector's Create Actions button, the Input System creates a default set of Actions. However, the PlayerInput component places no restrictions on the arrangement of Actions.
PlayerInput automatically handles enabling and disabling Actions, and also handles installing callbacks on the Actions. When multiple PlayerInput components use the same Actions, the components automatically create private copies of the Actions.
When first enabled, PlayerInput enables all Actions from the the Default Action Map. If no default Action Map exists, PlayerInput does not enable any Actions. To manually enable Actions, you can call Enable and Disable on the Action Maps or Actions, like you would do without PlayerInput. To check which Action Map is currently enabled, or to switch to a different one, use the PlayerInput.currentActionMap property. To switch Action Maps with an Action Map name, you can also call PlayerInput.SwitchCurrentActionMap.
To disable a player's input, call PlayerInput.DeactivateInput. To re-enable it, call PlayerInput.ActivateInput. The latter enables the default Action Map, if it exists.
When PlayerInput is disabled, it automatically disables the currently active Action Map (PlayerInput.currentActionMap) and disassociate any Devices paired to the player.
See the notification behaviors section below for how to be notified when player triggers an Action.
SendMessage/BroadcastMessage Actions
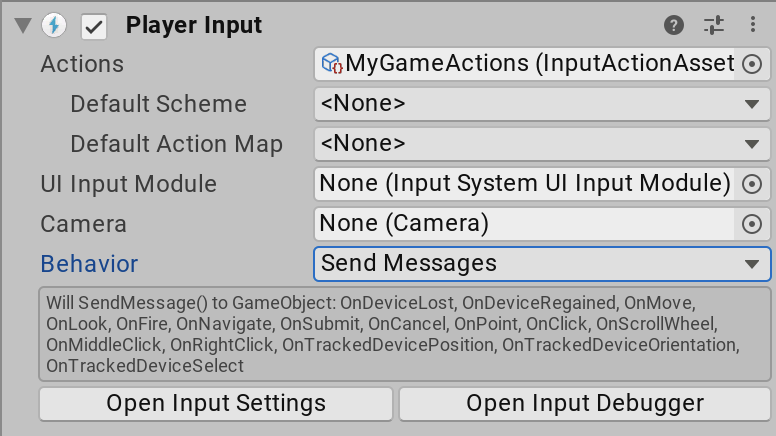
When the notification behavior of PlayerInput is set to Send Messages or Broadcast Messages, you can set your app to respond to Actions by defining methods in components like so:
public class MyPlayerScript : MonoBehaviour
{
    // "fire" action becomes "OnFire" method. If you're not interested in the
    // value from the control that triggers the action, use a method
    // without arguments.
    public void OnFire()
    {
    }

    // If you are interested in the value from the control that triggers an action,
    // you can declare a parameter of type InputValue.
    public void OnMove(InputValue value)
    {
        // Read value from control. The type depends on what type of controls.
        // the action is bound to.
        var v = value.Get<Vector2>();

        // IMPORTANT: The given InputValue is only valid for the duration of the callback.
        //            Storing the InputValue references somewhere and calling Get<T>()
        //            later does not work correctly.
    }
}
The component must be on the same GameObject to use Send Messages, or on any child GameObject to use Broadcast Messages.
UnityEvent Actions
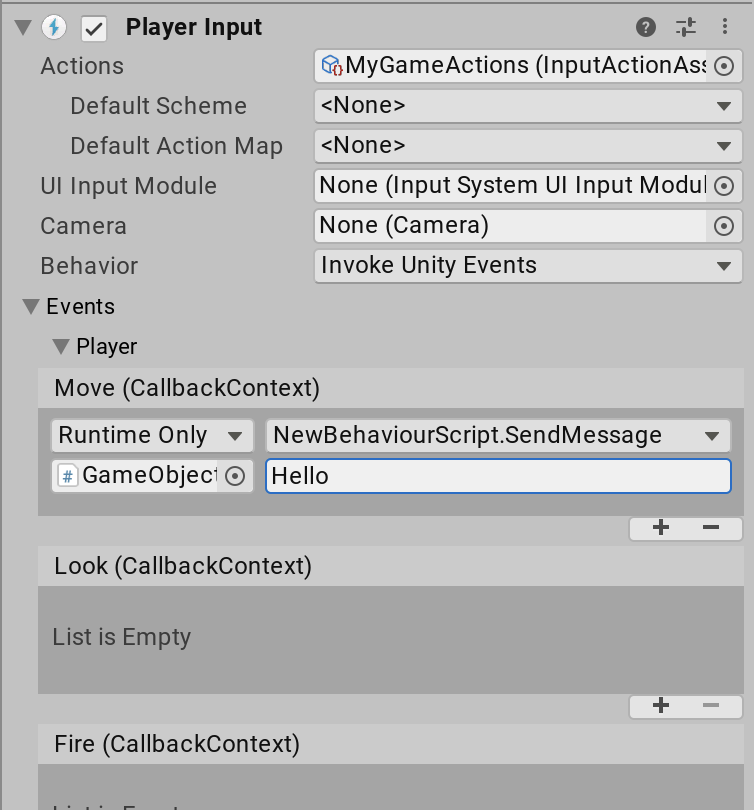
When the notification behavior of PlayerInput is set to Invoke Unity Events, each Action has to be routed to a target method. The methods have the same format as the started, performed, and canceled callbacks on InputAction.
public class MyPlayerScript : MonoBehaviour
{
    public void OnFire(InputAction.CallbackContext context)
    {
    }

    public void OnMove(InputAction.CallbackContext context)
    {
        var value = context.ReadValue<Vector2>();
    }
}
Notification behaviors
You can use the Behavior property in the Inspector to determine how a PlayerInput component notifies game code when something related to the player has occurred.
The following options are available:
| Behavior | Description |
|---|---|
Send Messages |
Uses GameObject.SendMessage on the GameObject that the PlayerInput component belongs to. |
Broadcast Messages |
Uses GameObject.BroadcastMessage on the GameObject that the PlayerInput component belongs to. This broadcasts the message down the GameObject hierarchy. |
Invoke Unity Events |
Uses a separate UnityEvent for each individual type of message. When this is selected, the events available on the PlayerInput are accessible from the Events foldout. The argument received by events triggered for Actions is the same as the one received by started, performed, and canceled callbacks. |
Invoke CSharp Events |
Similar to Invoke Unity Events, except that the events are plain C# events available on the PlayerInput API. You cannot configure these from the Inspector. Instead, you have to register callbacks for the events in your scripts.The following events are available:
|
In addition to per-action notifications, PlayerInput sends the following general notifications:
| Notification | Description |
|---|---|
DeviceLostMessage |
The player has lost one of the Devices assigned to it. This can happen, for example, if a wireless device runs out of battery. |
DeviceRegainedMessage |
Notification that triggers when the player recovers from Device loss and is good to go again. |
Device assignments
Each PlayerInput can have one or more Devices assigned to it. By default, no two PlayerInput components are assigned the same Devices, but you can force this; to do so, manually assign Devices to a player when calling PlayerInput.Instantiate, or call InputUser.PerformPairingWithDevice on the InputUser of a PlayerInput.
If the PlayerInput component has any Devices assigned, it matches these to the Control Schemes in the associated Action Asset, and only enables Control Schemes which match its Input Devices.
UI input
The PlayerInput component can work together with an InputSystemUIInputModule to drive the UI system.
To set this up, assign a reference to a InputSystemUIInputModule component in the UI Input Module field of the PlayerInput component. The PlayerInput and InputSystemUIInputModule components should be configured to work with the same InputActionAsset for this to work.
Once you've completed this setup, when the PlayerInput component configures the Actions for a specific player, it assigns the same Action configuration to the InputSystemUIInputModule. In other words, the same Action and Device configuration that controls the player now also controls the UI.
If you use MultiplayerEventSystem components to dispatch UI events, you can also use this setup to simultaneously have multiple UI instances on the screen, each controlled by a separate player.
PlayerInputManager component
NOTE: The Input System package comes with a sample called
Simple Multiplayerwhich you can install from the package manager UI in the Unity editor. The sample demonstrates how to usePlayerInputManagerto set up a simple local multiplayer scenario.
The Player Input system facilitates setting up local multiplayer games, where multiple players share a single device with a single screen and multiple controllers. Set this up using the PlayerInputManager component, which automatically manages the creation and lifetime of PlayerInput instances as players join and leave the game.
| Property | Description |
|---|---|
Notification Behavior |
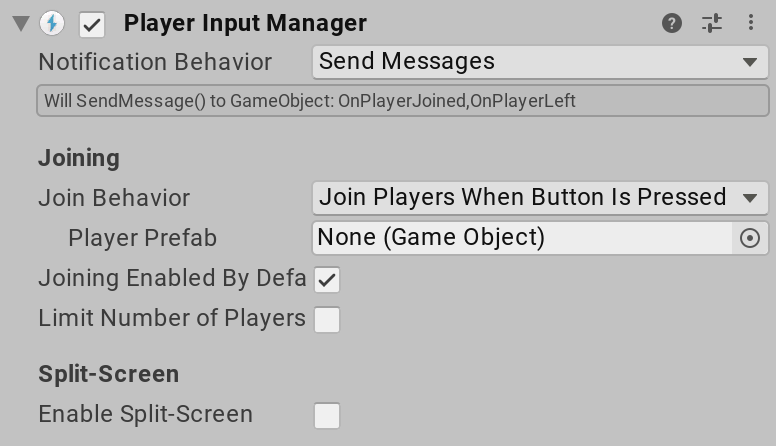
How the PlayerInputManager component notifies game code about changes to the connected players. This works the same way as for the PlayerInput component. |
Join Behavior |
Determines the mechanism by which players can join when joining is enabled. See documentation on join behaviors. |
Player Prefab |
A prefab that represents a player in the game. The PlayerInputManager component creates an instance of this prefab whenever a new player joins. This prefab must have one PlayerInput component in its hierarchy. |
Joining Enabled By Default |
While this is enabled, new players can join via the mechanism determined by Join Behavior. |
Limit Number of Players |
Enable this if you want to limit the number of players who can join the game. |
Max Player Count(Only shown when Limit number of Players is enabled.) |
The maximum number of players allowed to join the game. |
Enable Split-Screen |
If enabled, each player is automatically assigned a portion of the available screen area. See documentation on split-screen multiplayer. |
Join behaviors
You can use the Join Behavior property in the Inspector to determine how a PlayerInputManager component decides when to add new players to the game. The following options are available to choose the specific mechanism that PlayerInputManager employs.
| Behavior | Description |
|---|---|
Join Players When Button IsPressed |
Listen for button presses on Devices that are not paired to any player. If a player presses a button and joining is allowed, join the new player using the Device they pressed the button on. |
Join Players When Join Action Is Triggered |
Similar to Join Players When Button IsPressed, but this only joins a player if the control they triggered matches a specific action you define. For example, you can set up players to join when pressing a specific gamepad button. |
Join Players Manually |
Don't join players automatically. Call JoinPlayer explicitly to join new players. Alternatively, create GameObjects with PlayerInput components directly and the Input System will automatically join them. |
Split-screen
If you enable the Split-Screen option, the PlayerInputManager automatically splits the available screen space between the active players. For this to work, you must set the Camera property on the PlayerInput prefab. The PlayerInputManager then automatically resizes and repositions each camera instance to let each player have their own part of the screen.
If you enable the Split-Screen option, you can configure the following additional properties in the Inspector:
| Property | Description |
|---|---|
Maintain Aspect Ratio |
A false value enables the game to produce screen areas that have an aspect ratio different from the screen resolution when subdividing the screen. |
Set Fixed Number |
If this value is greater than zero, the PlayerInputManager always splits the screen into a fixed number of rectangles, regardless of the actual number of players. |
Screen Rectangle |
The normalized screen rectangle available for allocating player split-screens into. |
By default, any player in the game can interact with any UI elements. However, in split-screen setups, your game can have screen-space UIs that are restricted to just one specific camera. See the UI Input section above on how to set this up using the PlayerInput, InputSystemUIInputModule and MultiplayerEventSystem components.
PlayerInputManager notifications
PlayerInputManager sends notifications when something notable happens with the current player setup. These notifications are delivered according to the Notification Behavior property, in the same way as for PlayerInput.
Your game can listen to the following notifications:
| Notification | Description |
|---|---|
PlayerJoinedMessage |
A new player joined the game. Passes the PlayerInput instance of the player who joined.Note: If there are already active PlayerInput components present when PlayerInputManager is enabled, the PlayerInputManager sends a Player Joined notification for each of these. |
PlayerLeftMessage |
A player left the game. Passes the PlayerInput instance of the player who left. |

