RecordingTimelineTrack.md 2.6 KB
Recording from a Timeline track
This page explains how to set up and launch a recording from a Timeline Track.
If you want to record from the Recorder window, see Recording in Play mode.
You can start and stop recordings from Timeline. A Recorder Track in Timeline contains one or more Recorder Clips. Each clip defines a recording for the Recorder to capture while Timeline plays the Recorder Track.
Setting up Recorder Clips
To set up a recording session in a Timeline instance:
Select the GameObject associated with the Timeline Asset.
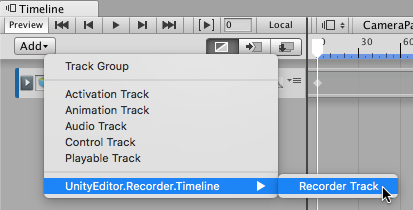
In the Timeline window, click the Add (+) button.
From the context menu, select UnityEditor.Recorder.Timeline > Recorder Track.
Right-click the Recorder Track.
From the context menu, select Add Recorder Clip.
Select the Recorder Clip and edit properties in the Inspector window.
Editing Recorder Clip properties
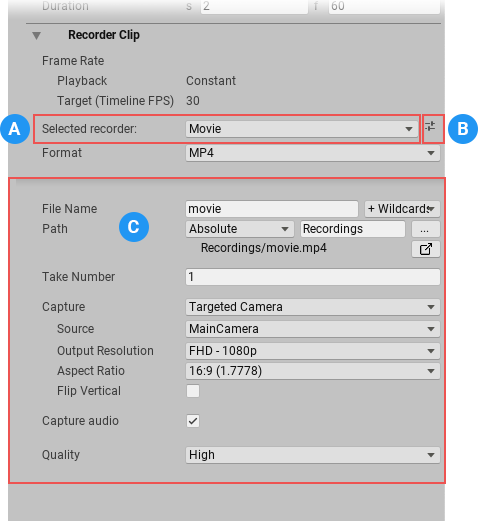
Recorder Clip properties are the same as regular Recorder properties, but you set them from the Recorder Clip inspector rather than the Recorder window.
|||
|-|-|
| | Choose the type of Recorder you want the Recorder Clip to use. |
|
 | Load any existing Recorder Preset, or save the current Recorder Clip settings as a Preset. |
|
 | Set the Recorder Clip properties. These vary according to the Selected Recorder setting. You set them the same way you set regular Recorder properties. |
[!NOTE] Unity stores the Recorder Clip properties in the Timeline Track. They do not affect properties you set in the Recorder window.
The Recorder Clip Inspector also includes a subset of the recording controls in the Recorder window.
|||
|-|-|
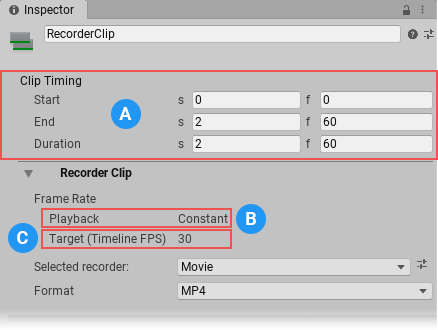
| | The Recorder Clip's Clip Timing properties control the recording's Start, End, and Duration. |
|
 | The Frame Rate > Playback property is locked to Constant mode, because Timeline plays back at a constant frame rate. |
|
 | The Recorder Clip inherits its Frame Rate > Target setting from the Timeline’s Frame Rate setting. |


