post-processing-bloom.md 3.2 KB
Bloom
The Bloom effect creates fringes of light extending from the borders of bright areas in an image. This creates the illusion of extremely bright light overwhelming the Camera.
The Bloom effect also has a Lens Dirt feature, which you can use to apply a full-screen layer of smudges or dust to diffract the Bloom effect.
Using Bloom
Bloom uses the Volume system, so to enable and modify Bloom properties, you must add a Bloom override to a Volume in your Scene.
To add Bloom to a Volume:
- In the Scene or Hierarchy view, select a GameObject that contains a Volume component to view it in the Inspector.
- In the Inspector, navigate to Add Override > Post-processing, and click on Bloom. Universal Render Pipeline applies Bloom to any Camera this Volume affects.
Properties
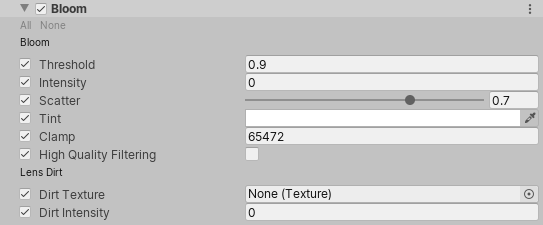
Bloom
| Property | Description |
|---|---|
| Threshold | Set the gamma space brightness value at which URP applies Bloom. URP does not apply Bloom to any pixels in the Scene that have a brightness lower than this value. The minimum value is 0, where nothing is filtered. The default value is 0.9. There is no maximum value. |
| Intensity | Set the strength of the Bloom filter, in a range from 0 to 1. The default is 0, which means that the Bloom effect is disabled. |
| Scatter | Set the radius of the bloom effect in a range from 0 to 1. Higher values give a larger radius. The default value is 0.7. |
| Tint | Use the color picker to select a color for the Bloom effect to tint to. |
| Clamp | Set the maximum intensity that Unity uses to calculate Bloom. If pixels in your Scene are more intense than this, URP renders them at their current intensity, but uses this intensity value for the purposes of Bloom calculations. The default value is 65472. |
| High Quality Filtering | Enable this to use high quality sampling. This reduces flickering and improves the overall smoothness, but is more resource-intensive and can affect performance. |
Lens Dirt
| Property | Description |
|---|---|
| Texture | Assign a Texture to apply the effect of dirt (such as smudges or dust) to the lens. |
| Intensity | Set the strength of the Lens Dirt effect. |
Troubleshooting performance issues
There are multiple ways to improve the performance impact of Bloom. Listed in order of effectiveness, you can:
- Disable High Quality Filtering. Bloom then uses bilinear filtering instead of bicubic. This reduces the overall smoothness of the Bloom effect, but greatly improves performance, especially on lower-end hardware and platforms. In some extreme cases, you might see blocky graphical artifacts in your Scene.
- Use a lower resolution Lens Dirt Texture to reduce memory pressure and speed up blending across volumes.
