# About com.unity.xr.legacyinputhelpers
The com.unity.xr.legacyinputhelpers package contains a number of useful helpers for building XR Projects.
These include the Tracked Pose Driver and the Input Asset XR Bindings Seed Utility.
This document also contains sections on how to use, or migrate your project to, the XR Plugin Framework.
## Requirements
The com.unity.xr.legacyinputhelpers package version 1.4.0 is compatible with the following versions of the Unity Editor:
* 2019.3+ (recommended)
* 2019.1+ (minimum)
# Installing com.unity.xr.legacyinputhelpers
To install this package, follow the instructions in the [Package Manager documentation](https://docs.unity3d.com/Manual/upm-ui-install.html).
# Using com.unity.xr.legacyinputhelpers
The com.unity.xr.legacyinputhelpers package contains the following helpers for building XR Projects:
* [Tracked Pose Driver](#Tracked-Pose-Driver)
* [XR Input Binding Seeder](#Seeding-XR-Input-Bindings)
* [Arm Models](ArmModels.md)
* [Camera Offset](#Camera-Offset)
* [XR Rig Explanation](#XR-Rig-Explanation)
To use, or migrate your project to, the new XR Plugin Framework, see the [Migrating to the XR Plugin Framework / XR Management](#Migrating-to-the-XR-Plugin-Framework) section on this page.
# Tracked Pose Driver
Use the Tracked Pose Driver component to update a GameObject’s transform to match that of a tracked device. A tracked device is any input device that can generate a Pose (such as a VR HMD, an AR device, or an MR tracked controller).
The following section details the different settings and options available to the Tracked Pose Driver.
## Settings
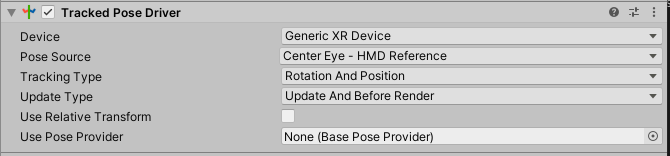
### Device and Pose Source fields
The Tracked Pose Driver updates a target transform using a pose source. The final pose source is identified using the **Device** and **Pose Source** fields.
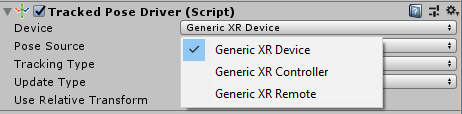
The **Device** field indicates which type of device the pose source will be obtained from. This field has the following options:
| **Option** | **Description** |
| ------ | ----------- |
| **Generic XR Device** | Represents VR HMDs and AR device poses. |
| **Generic XR Controller** | Represents VR controllers. |
| **Generic XR Remote** | Represents mobile-based remote devices. |
The following image shows the options above in the actual Tracked Pose Driver component.
Once you set the **Device** field, Unity updates the **Pose Source** field with the available sources for that device. The table below lists all the possible sources.
| **Device** | **Source** | **Description** | **Usage** |
| ------ | ------ | ----------- | ----- |
| **Generic XR device** | Left Eye | The pose of the left eye of the device. | VR HMDs |
| | Right Eye | The pose of the right eye of the device. | VR HMDs |
| | Center Eye - HMD Reference| The pose of the center eye of the device. | VR HMDs |
| | Head | The pose of the head of the device, if available. For most devices, the Head pose will be the same as the Center Eye. | VR HMDs |
| | Color Camera | The pose of the color camera on the device, if available. The color camera is intended for use with AR devices that support camera-based spatial mapping. | AR devices |
| **Generic XR Controller** | Left Controller | The left controller device pose, if available. This is intended to be used with 6 degrees of freedom style controllers commonly used with VR and MR devices. | 6 and 3 degrees of freedom VR tracked controllers |
| | Right Controller | The right controller device pose, if available. Zero if unavailable. This is intended to be used with 6 degrees of freedom style controllers commonly used with VR and MR devices. | 6 and 3 degrees of freedom VR tracked controllers |
| **Generic XR remote** | Device Pose | This pose is intended to be used with 3 degrees of freedom style controllers commonly used with mobile VR devices (for example, the Google Daydream Controller). |Mobile 3 degrees of freedom tracked controllers |
If a requested source pose is not valid, Unity provides a position vector that consists of zeros and an identity quaternion. The following image shows the possible values for the **Pose Source** field when the **Device** is set to Generic XR Device.
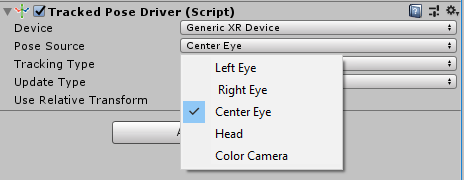
For camera or HMD tracking, use the Center Eye - HMD Reference value. For ease of use, this is the default setting of the Tracked Pose Driver.
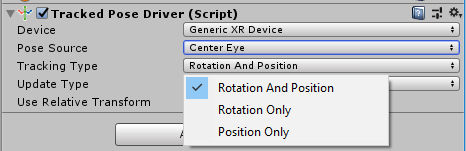
## Tracking Type field
Use the **Tracking Type** field to control how the tracked pose is applied to the target transform. This field has the following options:
| **Option** | **Description** |
| ------ | ----------- |
| **Position Only** | The Position part of the source pose will be applied to the target transform.|
| **Rotation Only** | The Rotation part of the source pose will be applied to the target transform.|
| **Both Position and Rotation** | The entire source pose will be applied to the target transform. This is the default setting. |
The screenshot below shows all of these options.
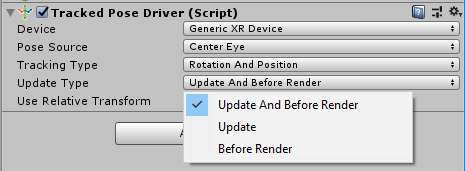
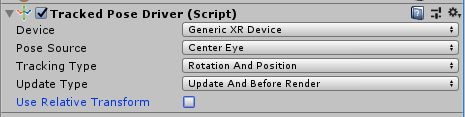
## Update Type field
Use the **Update Type** field to control when the Tracked Pose Driver applies updates from the tracked pose source. You can select one of the following options:
- Update And Before Render
- Update
- Before Render
The default and recommended option is Update And Before Render, especially in situations where a Tracked Pose Driver is driving a camera pose. To ensure user comfort and minimize latency, it is critically important to have the position of the camera updated as close to rendering as possible.
The following table outlines when, during the frame, the Target Pose will be updated:
| **Option** | **Fixed Update** | **Update** | **Before Render** |
| ----- | ----------- | ------ | ------ |
| **Before Render Only** | No | No | Yes |
| **Update Only** | Yes | Yes | No |
| **Both Update and Before Render** | Yes | Yes | Yes |
The Update option causes the transform to be set in both Fixed Update (if happening that frame) and the start of the normal Update frame. This ensures that the target transform is in the correct location before executing any scripts during those phases.
The screenshot below shows the options available for the **Update Type** field.
## Use Relative Transform option
**Note: This option will be deprecated in the future, please do not use.**
The **Use Relative Transform** option allows you to control how the pose source is applied to the target transform. For instructions on how to migrate your project to use the recommended XR Rig please see the [Migrating to the XR Plugin Framework](#Migrating-to-the-XR-Plugin-Framework) section in this document.
If the **Use Relative Transform** option is:
* Enabled, the Tracked Pose Driver caches the original position of the transform internally. Unity then uses this position to offset any source pose values so they are correct in relation to the starting location of the object being controlled.
* Disabled, the Tracked Pose Driver will apply the source pose value directly to the target transform. This is useful when the target transform is part of a greater transform hierarchy.
The screenshot below shows the **Use Relative Transform** option.
This option was added to provide compatibility with the implicit camera control for VR cameras within Unity. Unity will deprecate this option, along with **Reference Transform** for implicit cameras, in a future release. Follow the best practices for Object Hierarchies to correctly reflect tracked objects in the appropriate space.
## Additional information
* The Tracked Pose Driver can only track one pose at a time.
* If the device and pose combination are not valid, the resulting transform will be zero position and identity rotation.
* You can change the tracked node at runtime via script.
### Special case behaviour when attached to cameras
* When attached to a camera, the implicit VR Device control of the camera transform is disabled, and the value generated by the Tracked Pose Driver is used instead.
For information on how to configure the Tracked Pose Driver to track cameras, see the [Device & Pose Source](#Device-&-Pose-Source) section of the document.
***
# Seeding XR input bindings
Use the **Seed XR Input Bindings** tool to populate the Input Asset with a set of cross-platform bindings intended for use with XR Devices.
To open the tool, after you load the Legacy Input Helpers package in your Project, go to **Assets > Seed XR Bindings** from Unity's main menu.
Clicking this menu option seeds the Input Manager with the Unity Cross-Platform Input bindings. The XR Input Bindings will not replace any bindings which are already present in the Input Manager with the same name.
***
# Migrating to the XR Plugin Framework
With the legacy built-in VR Device, Unity took control over any camera which was labeled with `Main Camera` and applied HMD tracking data to it. This is known as **implicit camera tracking** within Unity. While it was useful for simple HMD-only experiences, it proved confusing when users began to add controllers and other interactions. This was because implicit camera tracking functionality would cache the starting Local Position of the transform of the `Main Camera`, and would then apply tracking data on top of this transform. This transform was hidden from the user, and made handling of controllers and other complex scenarios difficult.
With the move to the [XR Plugin Framework](https://docs.unity3d.com/Manual/XRPluginArchitecture.html), Unity no longer provides implicit camera tracking. Instead, you can use the Tracked Pose Driver component as an-out-of-the-box solution to apply tracking information from various input sources to GameObject transforms within your Scene.
To migrate to the XR Plugin Framework, follow the migration steps outlined below. They cover two different scenarios: whether you're starting from a new Project or Scene, or migrating an existing one:
* [Starting from a new Scene](#Starting-from-a-new-Scene)
* [Starting from an existing Scene](#Starting-from-an-existing-Scene)
If you're already using the Tracked Pose Driver on your `Main Camera` or have your own tracking functionality, your current Scene is already configured correctly and you don't need to do anything else.
***
## Starting from a new Scene
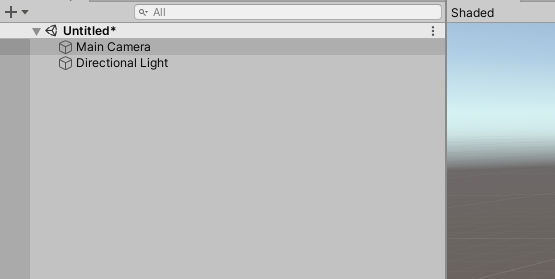
Follow the steps below if you're starting from a new Scene, or a scene that satisfies both of these conditions:
- There is only one camera in the Scene, and that camera is tagged as the `Main Camera`
- The camera in the Scene is at the root of the hierarchy
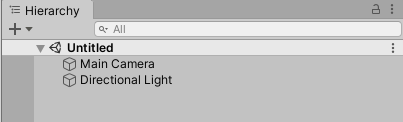
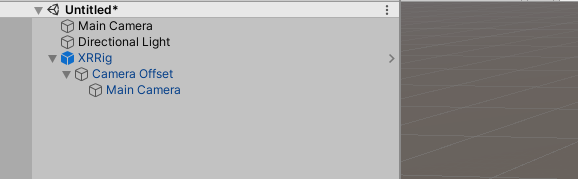
From Unity's main menu, go to **GameObject > XR > Add XR Rig**. This attempts to transform your new Scene into one that correctly supports the XR Plugin Framework.
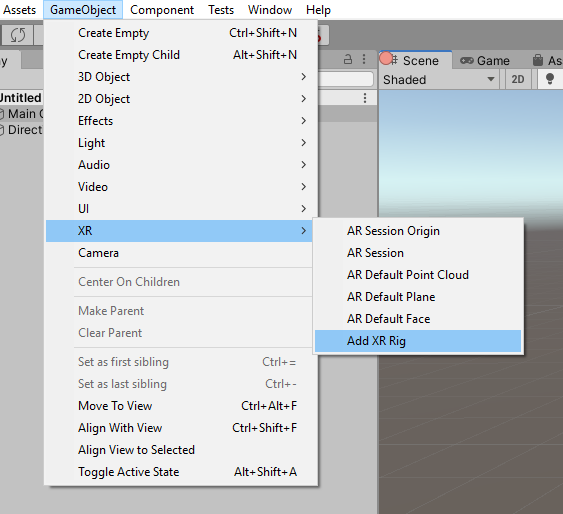
For example, the following image shows a new Scene that can be converted using the **Add AR Rig** option:
After you click the **Add AR Rig** option, this is the result:
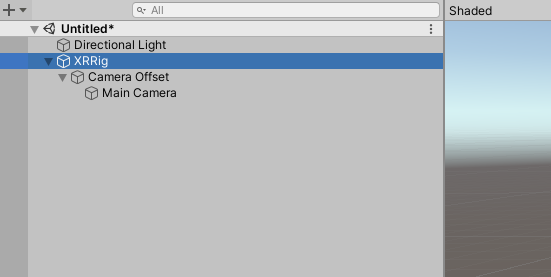
If there are no errors in the console log, you should now be able to press **Play** in your Scene to have the camera track against the device you have configured in the XR Plugin Management package. For more information on how to configure your Project for XR with XR Plugin Management, see documentation on the [XR Plugin Framework](https://docs.unity3d.com/Manual/XRPluginArchitecture.html).
If your Scene can't be migrated correctly, the Unity console will display an error. If this happens, follow the instructions in the the [Starting from an existing Scene](#Starting-from-an-existing-Scene) section below.
## Starting from an existing Scene
Migrating from an existing Scene has additional steps compared to migrating an empty Scene. As a result, there are different options depending on how your scene is configured. The overall goal is to have the Scene track in exactly the same way as it did before migrating to the XR Plugin Framework.
### Identify your Scene type
Find the camera in your Scene which is tagged as the `Main Camera`. Unity uses this camera to render to the HMD or other main device.
If the `Main Camera` GameObject is at the root of your Unity Hierarchy, follow the steps for [Migrating a simple Scene](#Migrating-a-simple-Scene).
If the `Main Camera` GameObject is not at the root of your Unity Hierarchy, follow the steps for [Migrating a complex Scene](#Migrating-a-complex-Scene).
### Camera Offset
The Camera Offset component is a Monobehaviour that the XR Rig uses to perform two tasks:
* Select which type of origin tracking the application wants to use
* At runtime, if the HMD is operating using a Device Tracking Origin, the Camera Offset component will apply a Y axis uplift to the specified component. This uplift simulates the height of the user.
The camera needs to be uplifted in Device Tracking Origin modes because the tracking data returned by the HMD or device does not contain the height of the user, nor the height of the device from the ground.
If the **Requested Tracking Mode** is set to Floor, the tracking data implicitly contains the height of the device from the floor, so you don't need to apply any additional uplift.
It's important to apply this uplift between the XR Rig and any tracked camera or device, as this allows Unity to move the XR Rig as a unit without needing to account for any uplift when teleporting or locomoting. This also ensures that any other tracked devices which are reported in the same tracking space appear correctly in your Scene.
This component is a simplified version of the XR Rig Component found in the XR Interaction Toolkit package. It is applied automatically when you:
* Click the **Add XR Rig** menu option.
* Create an instance of the XR Rig prefab.
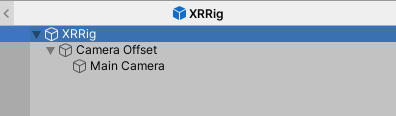
The following image shows the options for the Camera Offset component.

| **Option** | **Description** |
| ------ | ----------- |
| **Camera Floor Offset Object** | The GameObject, or transform, that will be shifted upwards in the Y axis in local space if the HMD is operating in Device Tracking Origin mode.|
| **Requested Tracking Mode** | The Requested Tracking Mode setting Use this option to request that the HMD (or other device) you're using operate in a specific mode. The options are:
- Default: Lets the HMD or device pick the Tracking Origin mode it runs in. Different devices have different defaults or user selections. The Camera Offset component will apply a camera offset if necessary.
- Device: Requests that the HMD or device use a Device Tracking Origin mode. If the HMD or device supports this, the GameObject or transform specified in the **Camera Floor Offset Object** field will be moved upwards in Y local space by the amount specified in the **Camera Y Offset** field.|
| **Floor** | Requests that the HMD or device use a Floor Tracking Origin. If the HMD or device supports this, no uplift will be applied to the **Camera Floor Offset Object**, because the tracking data returned by the device will implicitly contain the user's height. |
| **Camera Y Offset** | Specifies how far in the local Y axis the **Camera Floor Offset Object** will be moved, in meters. |
***
## Migrating a simple Scene
### 1. Create an instance of the XR Rig prefab.
Migrating a camera that was previously at the root of the Scene Hierarchy allows you to swap the existing camera to an XR Rig by instancing the XR Rig prefab that this package contains.
You can find this prefab in the `Packages/XR Legacy Input Helpers/Prefabs` folder:
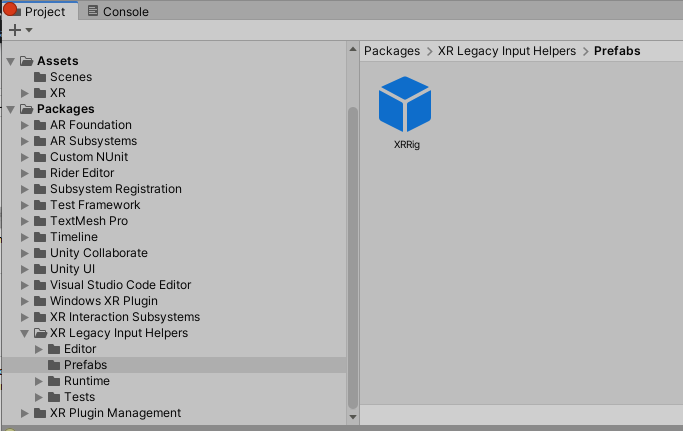
Drag this prefab into your scene hierarchy to create a new instance of the prefab.
### 2. Move the XR Rig to match the location of the camera.
Now that you have an instance of the XR Rig prefab, you need to configure the XR Rig GameObject so that the resulting camera positions will be correct when your application starts.
Change the position and rotation of the XR Rig GameObject so that it matches the position of the current `Main Camera`.
If you're applying a scale transformation to the `Main Camera`, make sure that you also apply this scale to the XR Rig GameObject. If you are going to scale the XR Rig, it's highly recommended to use a uniform scale across all three axes.
### 3. Replicate the position change, if necessary.
If the `Main Camera` in your non-migrated SCene is above the floor (its Y component is > 0.0f), you need to replicate this position change. You can do this in a few different ways, depending on what the original position the change was intended to replicate.
#### 3.1 - Uplift to simulate the height of the user
If the previous `Main Camera` was raised above the floor to simulate the height of the user and the application is using a Device Tracking Origin (sometimes called "Stationary" Tracking Mode) then this additional uplift will be performed by the [Camera Offset](#Camera-Offset) component. If this is not the case, see the next section.
To configure the camera to have a vertical uplift when the application is being used in a Device Tracking Origin mode, set the following options on the **Camera Offset** component on the XR Rig GameObject.
| **Option** | **Value** |
| ------ | ----- |
| **Requested Tracking Mode** | Device |
| **Camera Y Offset** | Set this option to the height at which the existing `Main Camera` was raised to simulate the user height.|
After you configure these options, change the XR Rig GameObject's Y Position to be what you would consider as the "floor" in your application (usually 0.0f). The **Camera Offset** component will add any additional uplift as needed.
#### 3.2 - Uplift indicates camera position
If your non-migrated Scene uses Floor Tracking Origin (historically referred to as "Room Scale" Tracking Mode), and the position of the `Main Camera` represents the user's starting point without including their height (that is, the camera is effectively on the logical "floor"), follow these steps to migrate your Scene correctly:
* Move the XR Rig to match the `Main Camera`'s current position and rotation in Unity world space.
* If the application is using a Floor Tracking Origin, set the **Requested Tracking Mode** on the **Camera Offset** component to Floor. This ensures that the camera has the correct vertical offset.
* If the application isn't using a Floor Tracking Origin, set the **Requested Tracking Mode** on the **Camera Offset** component to Default. This applies the correct behavior regardless of the device tracking mode the application starts with.
* If you were previously using a different component to move the camera vertically and handle the difference between Device and Floor tracking origins, you might need to disable or modify this component so that the camera will not be incorrectly moved multiple times by different components.
### 4. Replace the XR Rig Main Camera with your Main Camera
Now that the **Camera Offset** is correctly configured, you need to swap the XR Rig's Main Camera with your current `Main Camera` GameObject. If your current `Main Camera`:
* Doesn't have a Tracked Pose Driver component (or any other way of tracking the HMD) then you should copy the Tracked Pose Driver from XR Rig's Main Camera GameObject.
* Has a Tracked Pose Driver, make sure that the settings exactly match those for the XR Rig's Main Camera.
Next, delete the Main Camera GameObject from the XR Rig instance, and parent your existing `Main Camera` GameObject to the Camera Offset GameObject.
Make sure that the position and rotation of your `Main Camera` GameObject are both 0,0,0. Instead of changing the camera's position, always change the position of the XR Rig GameObject instead. Also, make sure that any GameObject, or Component links on any of the Components attached to your `Main Camera`, are still correct.
### 5. Configure XR Management
See documentation on the [XR Plugin Framework](https://docs.unity3d.com/Manual/XRPluginArchitecture.html) for details.
### 6. Press Play!
Now that your Scene has been successfully migrated, press **Play** and make sure that the camera's starting location is the same as it was before migrating to the XR Plugin Framework. If it's not, see the [Troubleshooting](#Troubleshooting) section below.
***
## Migrating a complex Scene
If your current Scene is using the implicit camera tracking from the legacy VR system, and the `Main Camera` is part of GameObject hierarchy, follow these steps to migrate ]your legacy VR tracking system to the XR Plugin Framework.
The Implicit camera update would update the local transform of the `Main Camera` GameObject twice each frame, which made the `Main Camera` GameObject moved relative to the position, scale and rotation of the hierarchy that it existed under.
In this scenario, you have two options to migrate your Scene:
1. [Leave the existing hierarchy in place and add components to enable tracking in the current hierarchy](#Leave-in-place)
2. [Migrate the existing hierarchy to use the XR Rig structure.](#Migrate-to-XR-Rig)
It's generally recommended to leave the existing hierarchy in place if your Scene has any functionality that relies on this hierarchy structure. If you have a relatively simple configuration, then you can migrate directly to the XR Rig.
### Leave in place
This method involves the least amount of modifications to the existing Scene hierarchy to enable tracking within Unity, and involves adding a Tracked Pose Driver to the `Main Camera` in your Scene. This ensures that any other functionality that requires your current GameObject hierarchy continues to function as before.
#### 1. Locate your `Main Camera` and add a Tracked Pose Driver to it
Locate the `Main Camera` in the Scene.
Add a Tracked Pose Driver, using the exact same settings that the XR Rig's Main Camera uses. The screenshot below shows a reference for these settings:

Do this for all the `Main Camera`s in your Scene. If you need to track other devices within your Scene, see the Tracked Pose Driver settings for the correct options for your use case.
#### 2. Configure XR Management
See documentation on the [XR Plugin Framework](https://docs.unity3d.com/Manual/XRPluginArchitecture.html) for details.
#### 3. Press Play!
Now that your Scene has been successfully migrated, press **Play** and make sure that the camera's starting location is the same as it was before migrating to the XR Plugin Framework. If it's not, see the [Troubleshooting](#Troubleshooting) section below.
### Migrate to XR Rig
Because there are an infinite number of possible hierarchies in use, Unity can't provide specific steps to migrate your current Scene hierarchy to use the XR Rig. Instead, the following section describes what the XR Rig is intended to represent, which will allow you to map your existing hierarchy to the concepts within the XR Rig.
To configure your scene to use XR Management, see documentation on the [XR Plugin Framework](https://docs.unity3d.com/Manual/XRPluginArchitecture.html).
If there are still issues, see the [Troubleshooting](#Troubleshooting) section.
#### XR Rig explanation
The XR Rig GameObject represents the transform from tracking space to Unity worlds pace. GameObjects parented to the XR Rig effectively live in the tracking space.
All devices that produce tracking data (HMDs, controllers, phones, etc.) report data relative to the same origin in the same tracking space.
Camera offset is used to raise the entire tracking space when the tracking space is in Device Tracking Origin mode. This mode tracks the origin of the tracking space as a historical position of the tracked device, and is typically found in mobile AR, integrated VR, stationary VR, and wearable AR devices. It does not account for user height, which is why you need to lift the tracking volume to simulate user height.
The Floor Tracking Origin mode tracks the origin of teh tracking space as the logical "floor" of the playspace. The tracking data provided in this mode implicitly contains the height of the device off the "floor". In this mode, you don't need to lift the tracking volume to have the camera placed correctly.
All tracked devices (head, hands, cameras, trackers, etc.) reported by the same device should be children of the Camera Offset game object of the same XR Rig. This lets you move the user, or all tracked devices that represent the user, by translating or rotating the XR Rig GameObject.
The actual location of objects within tracking space is unlikely to be at the origin of the tracking space. Teleporting the user requires some calculations to correctly orient the XR Rig in Unity world space so that the resulting HMD or camera position in Unity world space matches the intended result. The XR Interaction Toolkit package provides functionality which performs these calculations for you.
If your Scene requires scale, it should only be applied to the XR Rig GameObject, only uniformly across all axes.
All GameObjects that represent tracked devices must have some mechanism for updating their transform with their applicable device position and rotation. The Tracked Pose Driver covers this update. For HMDs, as a best practice, use the default settings.
**Note:** When working within a hierarchy where a GameObject (for example, XR Rig) provides the transform from tracking space to world space, you must disable the **Use Relative Transform** option for the transform to work properly.
The starting position of all tracked child objects of the XR Rig should be 0,0,0 position and 0,0,0 rotation, because the Tracked Pose Driver (or other tracking mechanism) will set the position of these objects.
***
## Troubleshooting
|Problem|Possible resolution|
|---|---|
| Camera is too high in the scene | Is the Camera Offset Component's Requested Tracking Mode set correctly?
Is the Camera Y Offset set too high? |
***
# Document Revision History
|Date|Reason|
|---|---|
|February 21, 2018|Initial edit.|
|September 13, 2018|Update to final release version, changed name to final|
|October 8, 2018| Renamed to legacyinputhelpers|
|October 15, 2018| Added section for seeding XR Input Bindings|
|July 19, 2018| Added section for using this package with XR Management|
|March 3, 2020| Added migration section + Camera Offset Section|
|March 12, 2020| Technical writer review|